Overview
Checklist: Reusable Lists is a private, offline app for iPhone, iPad, and Mac — for the lists you use again and again. No account, no sign-in, nothing to set up — open it and start.
There are three kinds of list, and they cover almost everything:
🔁 Reusable checklist
Build it once — a packing list, a gym bag, a weekly routine. Each time you need it, start a fresh run and check it off. The original template stays clean, so it's ready again next time.
📝 One-off list
A single list you check off once and you're done — like today's groceries or a quick to-do. No template to keep; it just lives in your library until you're finished with it.
📅 Daily to-do PRO
One list for each day. Unfinished tasks roll over to tomorrow on their own, finished ones stay on the day you did them. See Daily to-do.
Everything stays on your device. Checklist: Reusable Lists works fully offline and never asks you to create an account.
Your library
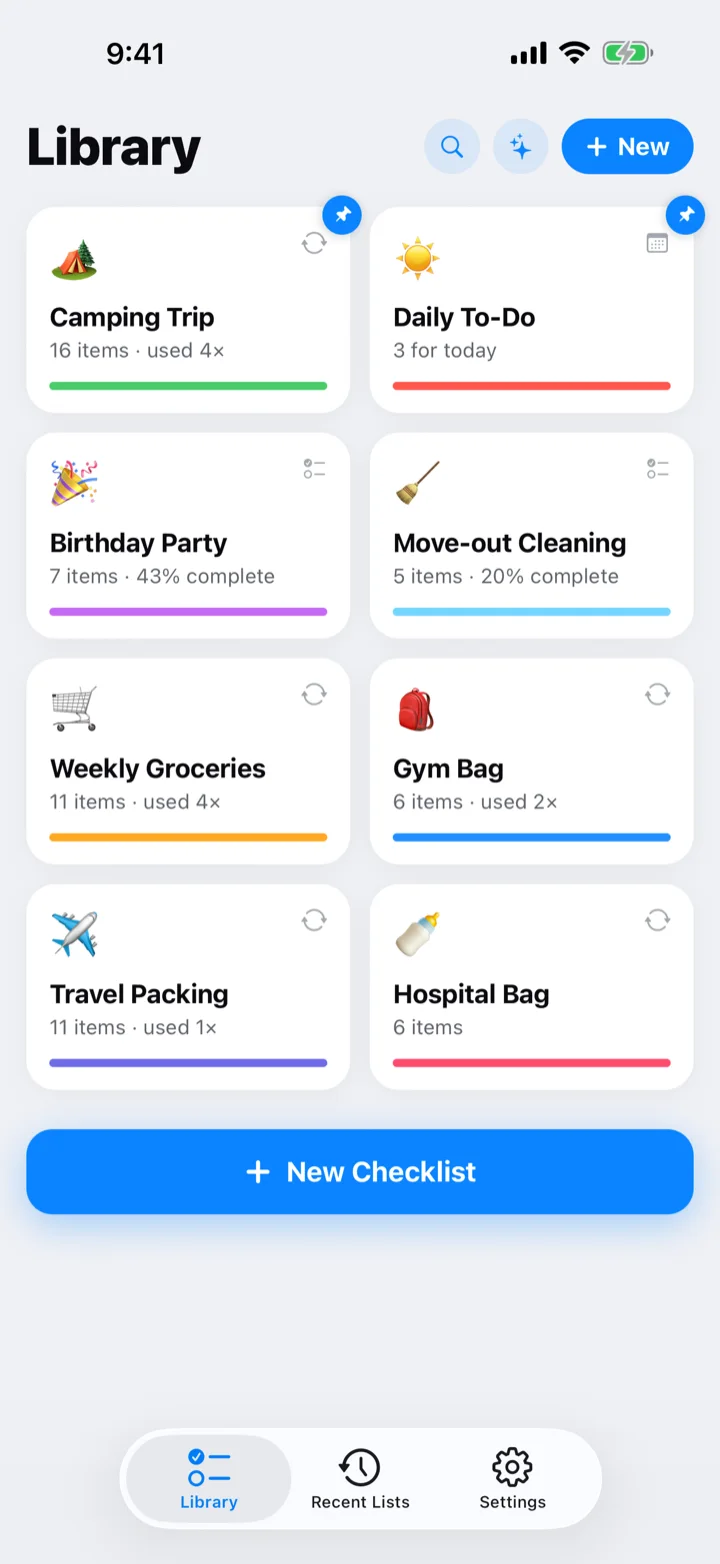
The Library tab is home. Every checklist you make appears here as a card showing its emoji, name, type badge, and progress.
Reading a card
Each card shows how many items the list has and — for a one-off or an in-progress run — how far along you are, with a colored progress bar. A small badge in the corner tells the type apart: 🔁 reusable, ☑️ one-off.
Keep it tidy
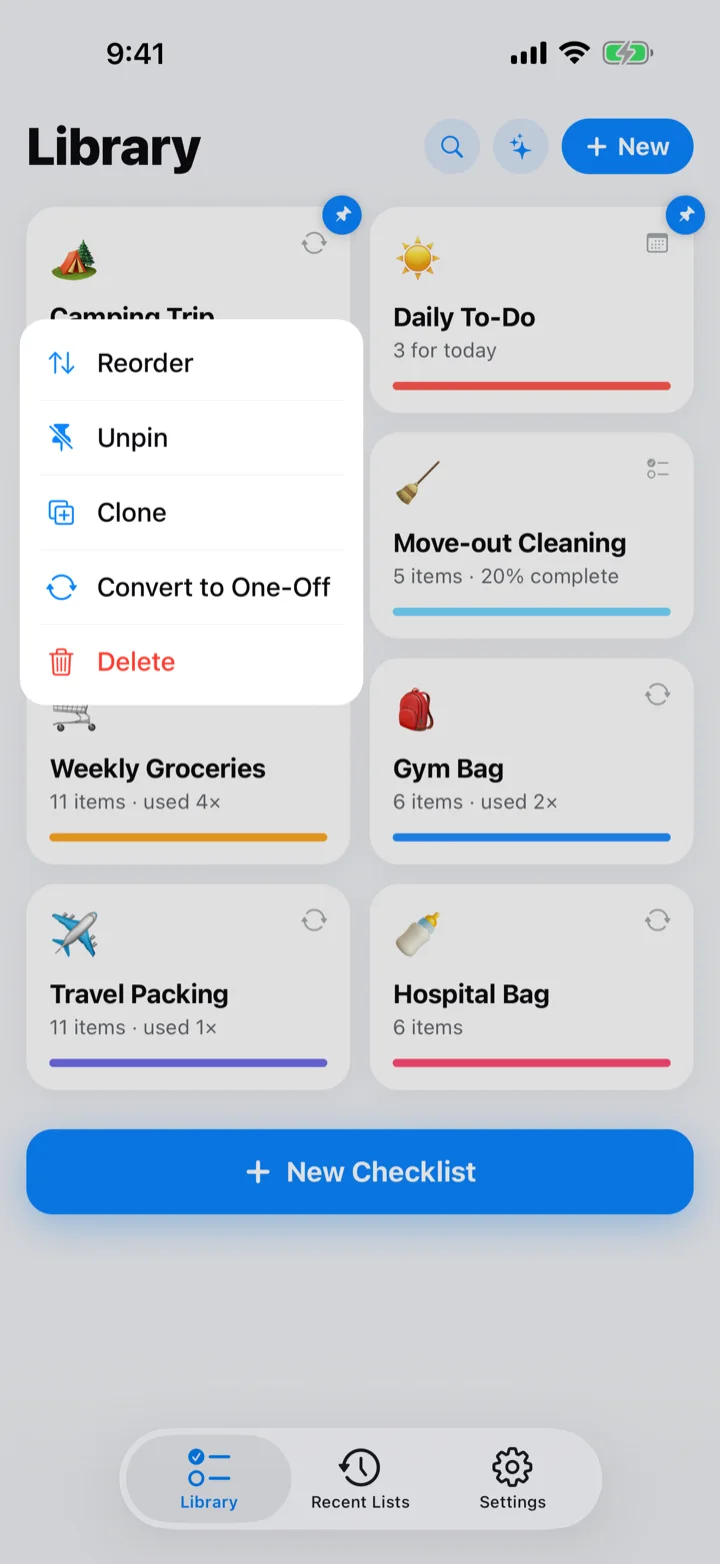
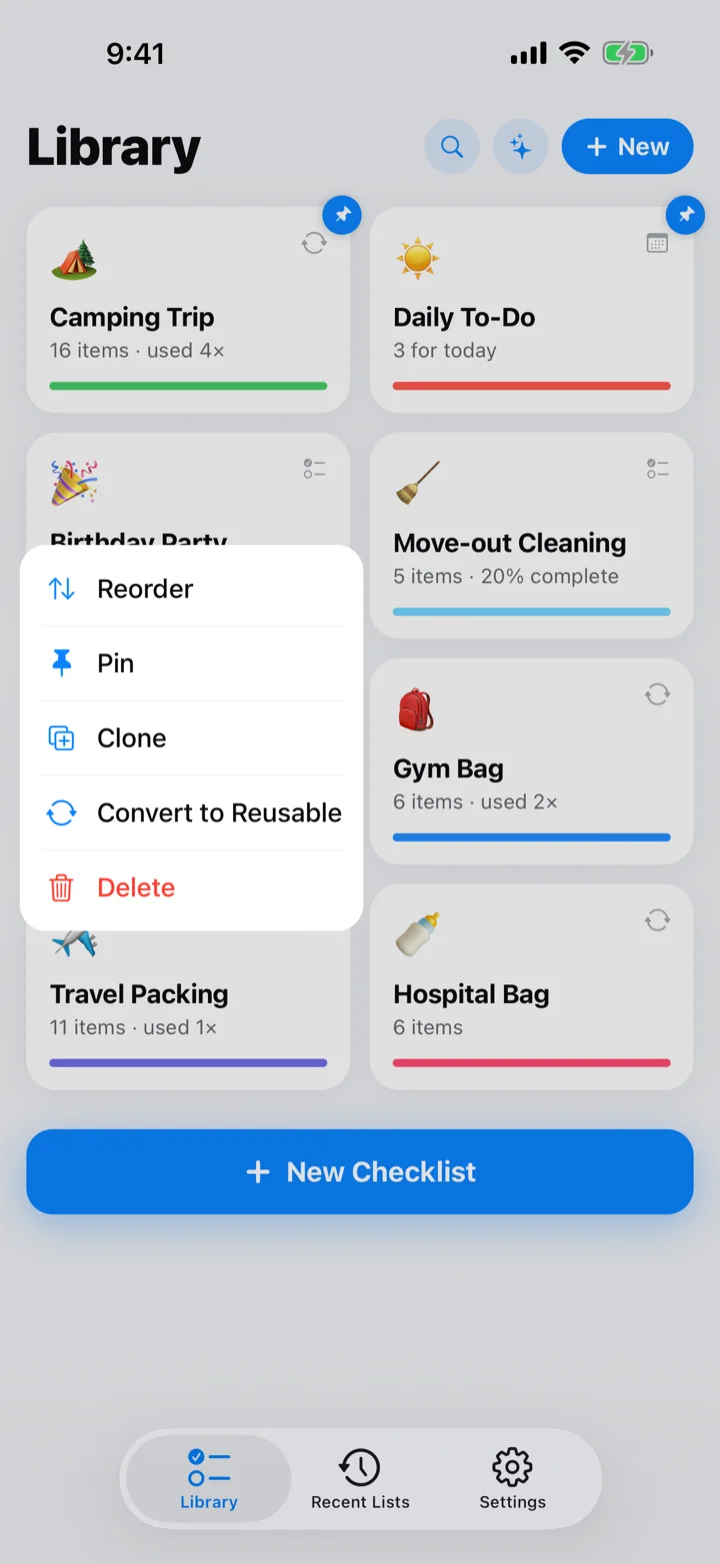
Long-press any card for its menu: Reorder (drag cards where you want them), Pin or Unpin (pinned lists stay at the top), Clone, Convert, and Delete. You can also swipe left on a card to delete it. Growing library? See Search & filters.
Tap any card to open it — a reusable list opens its detail, a one-off opens straight into checking off.
Search & filters
Once your library grows, find any list in a second — by its name, or by what's inside it.
- On the Library tab, tap the 🔍 Search button and start typing.
- Search matches list names and the items inside them — "passport" finds your travel list even if it's called "Summer trip." Lists that don't match dim out so the matches stand out.
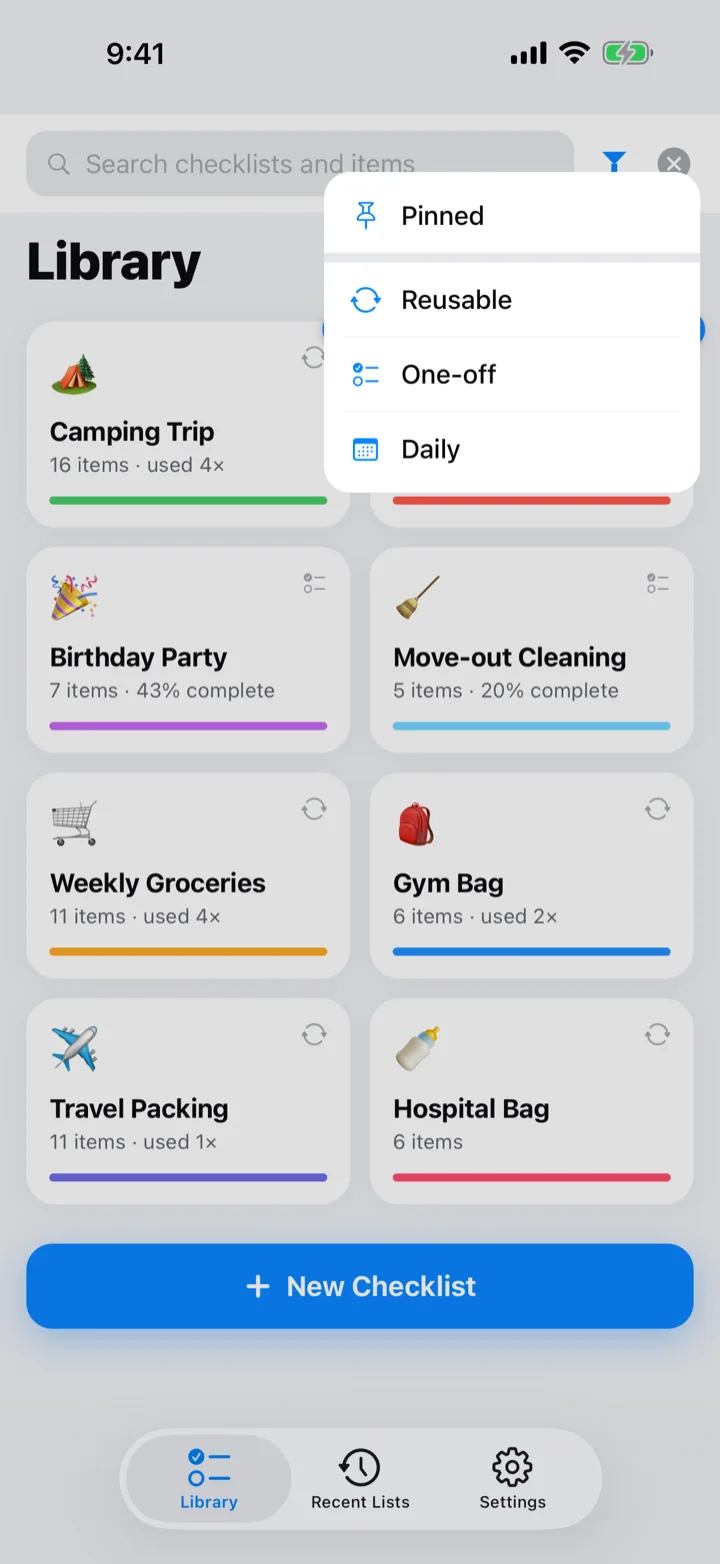
- Tap Filter next to the search box to show only Pinned, Reusable, One-off, or Daily lists. Clear Filter brings everything back.
- Tap ✕ to close search and return to the full library.
Create a checklist
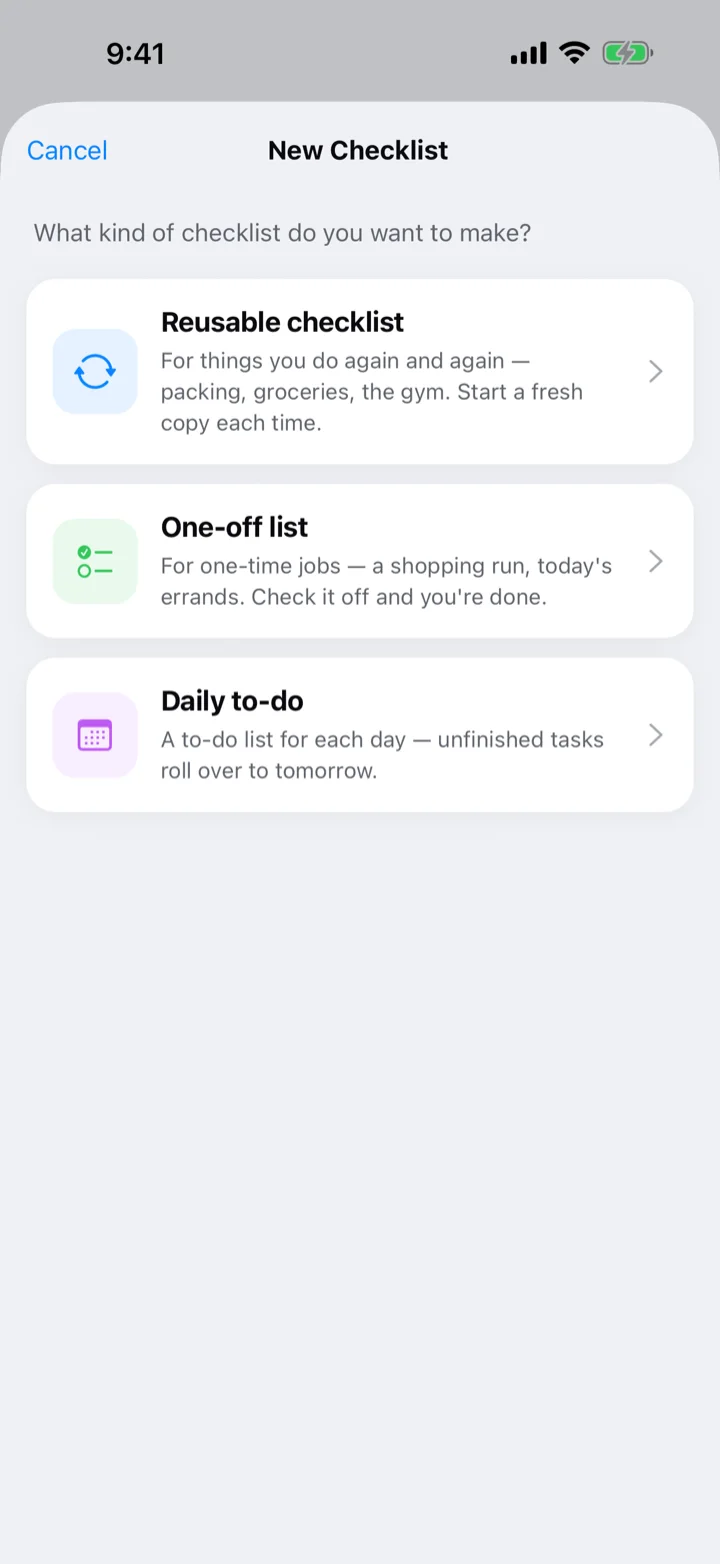
Tap + New and pick the kind of list you want. Every new list gets a fitting emoji and a color so it looks good instantly.
- On the Library tab, tap New (or New Checklist at the bottom).
- Choose Reusable checklist, One-off list, or Daily to-do PRO.
- You land straight in the editor with the cursor in the first item — start typing.
- Press return (or tap Next item) after each item to add the next one.
- Give it a name and tap Save.
Tap the emoji box to change the icon — the cursor jumps to the end, so just type or paste a new emoji and it replaces the old one.
Build & edit items
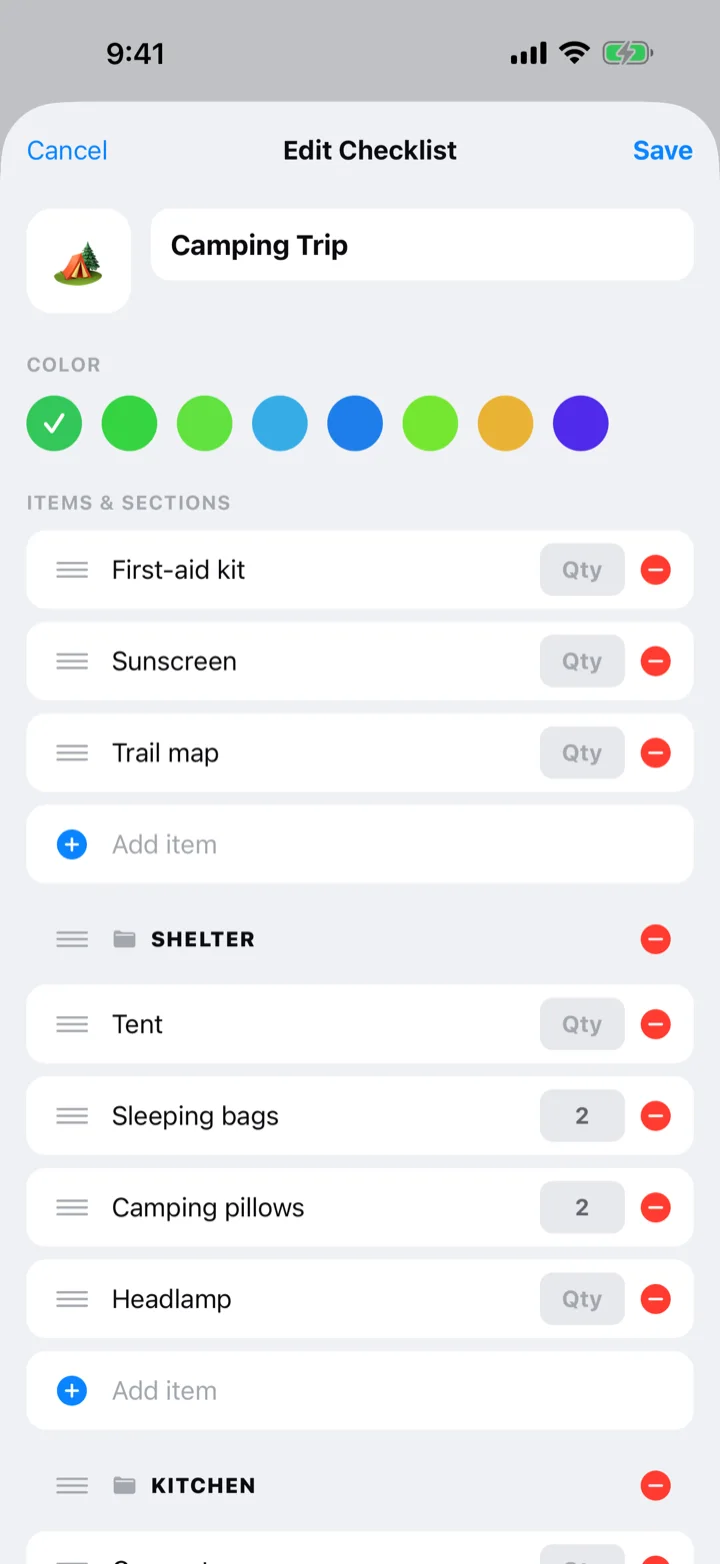
The editor is where a list takes shape. Add items, group them into sections, set quantities and notes, and reorder — all in one place.
Add & organize
- Type an item and press return (or tap Next item) to add the next line.
- Tap Add section to create a header — everything below it is grouped under that section until the next one. Each section has its own add row, so new items land right where they belong. Empty sections are kept, ready for later.
- Enter a number in the Qty box for "how many" (e.g. 2× batteries), and add a short note under any item.
- Drag the ≡ handle to reorder items and sections.
- Tap the red – (or swipe left) to remove a line.
Style it
Change the emoji, and pick a color from the row under the name. Tap Save to keep your changes.
Editing a reusable template never changes a run you've already started — each run is a snapshot, so your in-progress list is safe. And anything typed into an add field is saved when you leave the screen, so nothing gets lost.
Paste a list
Got a list in Notes, Messages, or an email? Paste it and every line becomes an item — no retyping.
- Copy the text anywhere — a note, a message, a web page.
- Paste it into Quick Add PRO, into any Add an item field on a list, or into the editor.
- Bullets and numbering are cleaned up, “x2” becomes a quantity, and a line ending in a colon — “Toiletries:” — becomes a section.
On iPhones, iPads, and Macs with Apple Intelligence, pasted lists and Quick Add are understood by Apple's on-device model — messy wording, quantities, and headings included. Private and offline; nothing leaves your device.
Run & check off
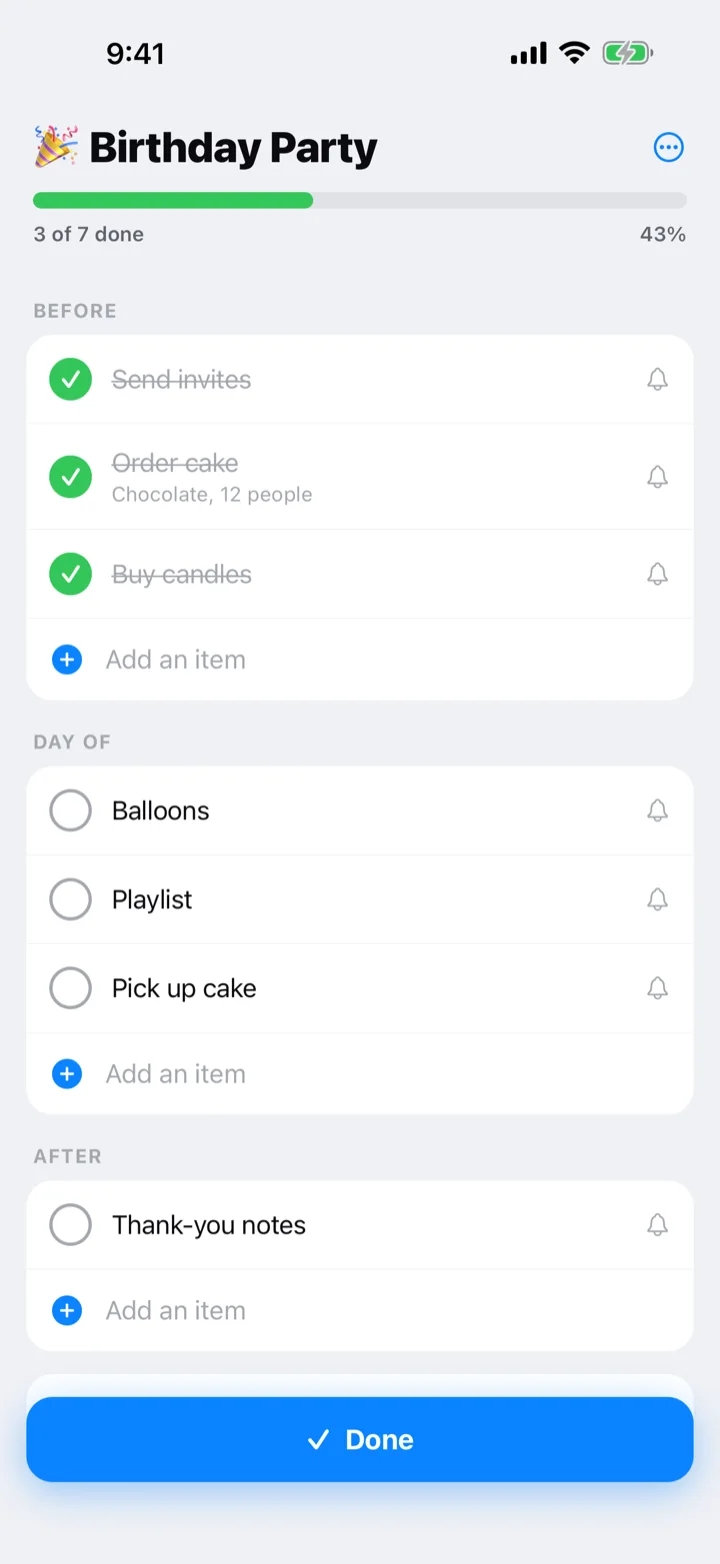
Checking things off is the heart of the app. Tap a row to mark it done — the progress bar fills as you go.
- Tap any item to check it off; tap again to uncheck.
- Completed items drop down under Done, so what's left is always front and center. Prefer them to stay put? Turn on Checked-off items → Keep in place in Settings.
- Need something that isn't on the list? Type it in Add an item — each section has its own add row, so it lands in the right group.
- Swipe left on an item to delete it, no edit mode needed.
- Tap an item's text to rename it right there, and touch and hold an item to lift it and drop it anywhere — even into another section.
- Finished? Tap Done at the bottom. A reusable run is saved to history; a one-off is simply complete.
List actions
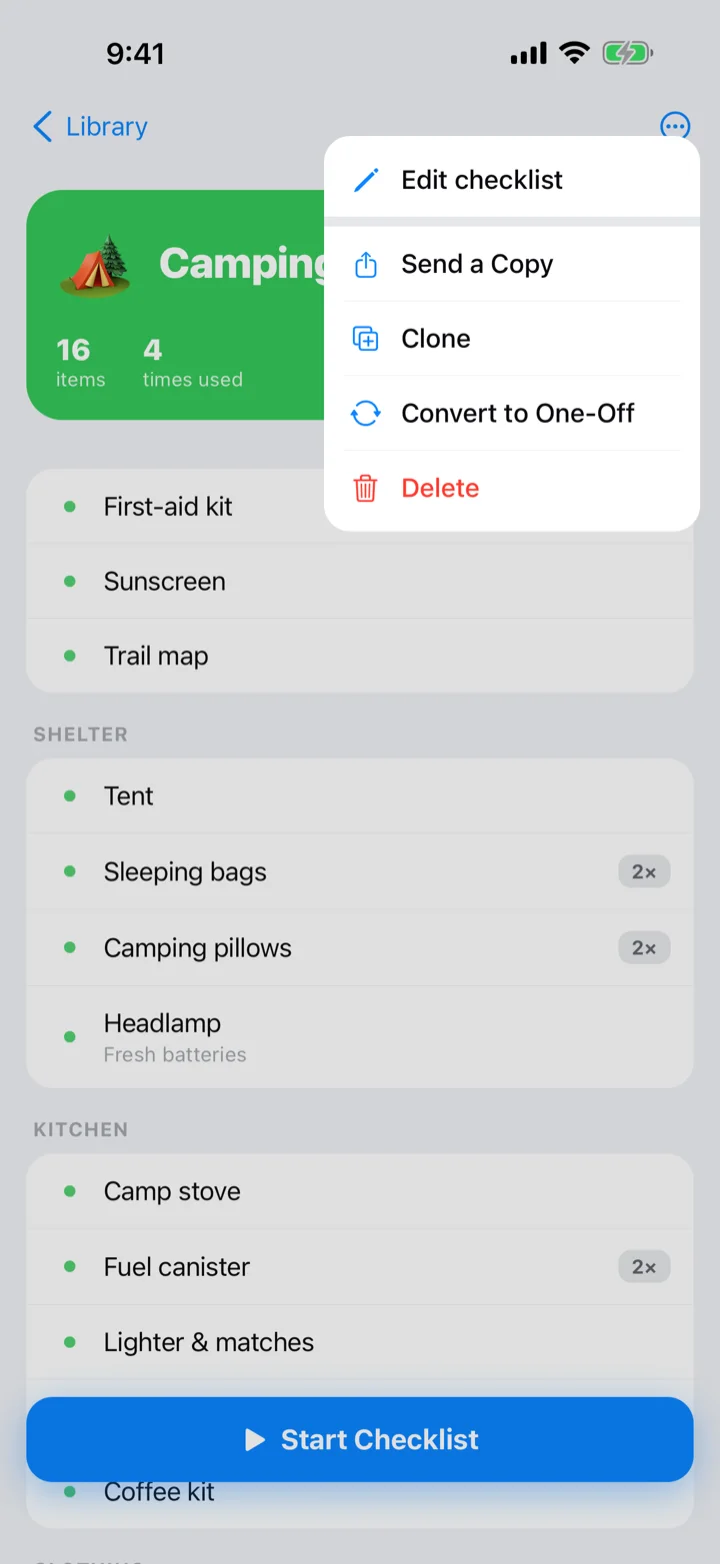
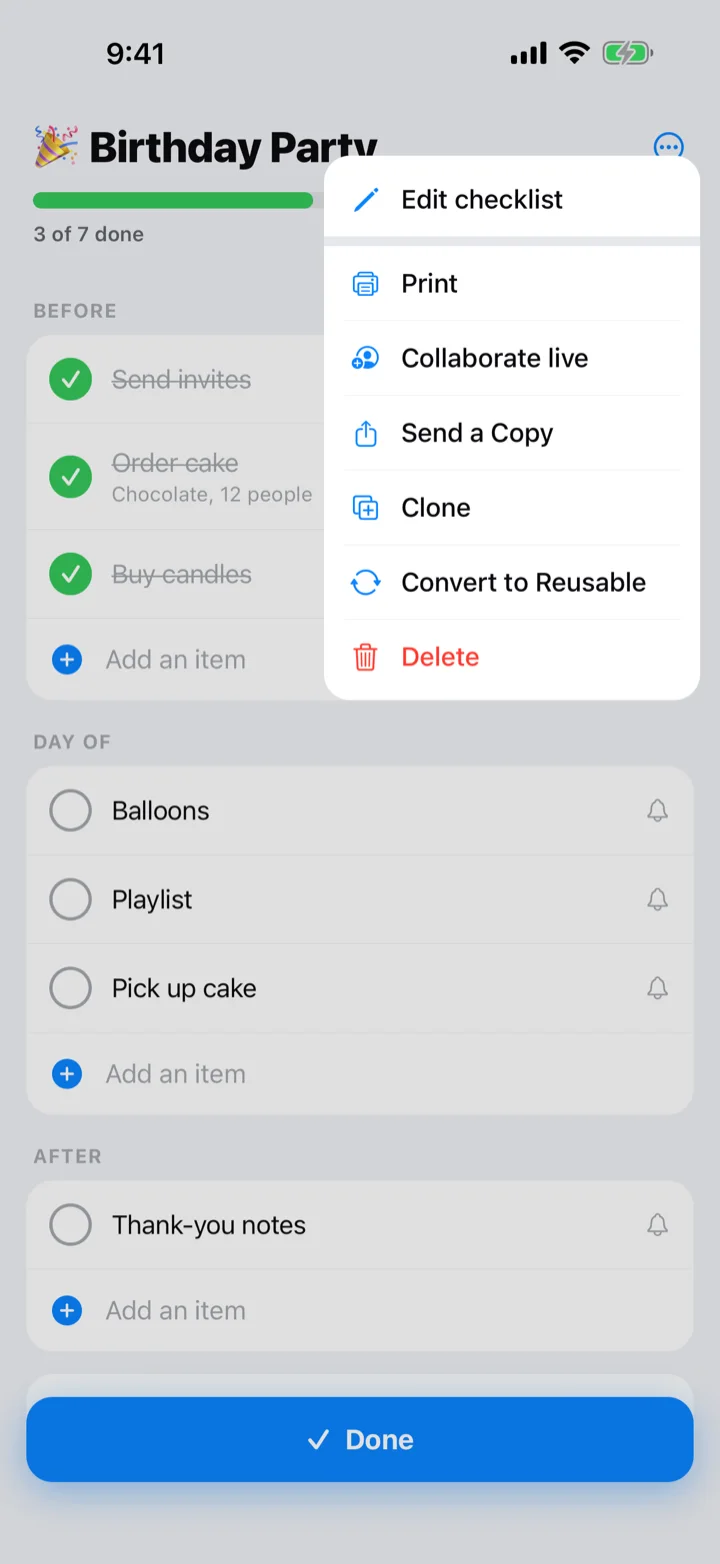
Tap the ⋯ button in the top-right corner for the list's actions — Edit checklist, Share, Clone, Convert (one-off ↔ reusable), and Delete. Pro adds Print PRO and Collaborate live PRO, and every item gets a 🔔 bell for a reminder PRO.
Reuse it forever
This is what makes Checklist: Reusable Lists different. A reusable checklist is a template you start fresh from, again and again — the template never gets "used up."
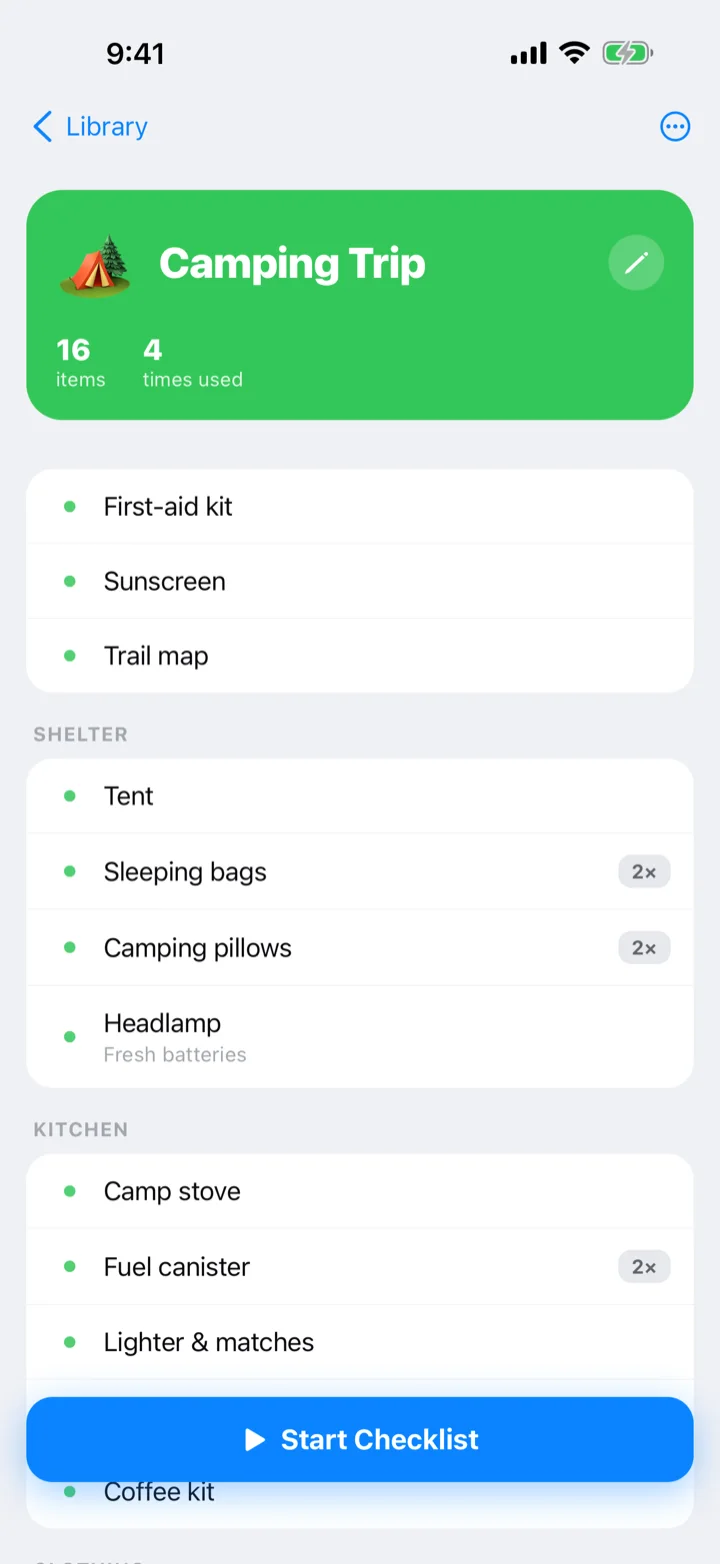
- Open a reusable checklist from your library.
- Review its items on the detail screen, then tap Start Checklist. If a run is already in progress, Resume takes you back to it and the button reads New Run instead.
- Check off your fresh run — the original stays pristine for next time.
- Finished? Tap Done. The run is saved under Recent runs on the detail screen and in Activity, and the template is ready to start again.
Turn a one-off into a template
Made a one-off that turned out to be useful? Convert it to a reusable checklist in one tap — nothing is lost.
The detail screen shows how many items the template has, how many times you've used it, and a ✏️ button to edit it.
Clone a checklist
Make an exact copy of any list — a variation of your packing list for a different trip, a second grocery list for the other store.
- Long-press the card in your library and choose Clone — or open the list and tap ⋯ → Clone.
- The copy appears right next to the original, named "… (1)". From the ⋯ menu you land on the copy straight away, ready to rename or edit.
What comes along
Everything: sections, quantities, notes, emoji and color. A one-off keeps its checked-off state; a daily to-do copies every day, plans and history included. A pinned list makes a pinned copy so the two stay together.
Reminders aren't copied — they point at events in your calendar, so the copy starts with its bells empty.
Convert one-off ↔ reusable
Started a quick one-off that turned out to be a keeper? Or made a template you only need once? Switch the type in a tap — nothing is deleted either way.
- Long-press the card and choose Convert to Reusable or Convert to One-Off — or use ⋯ → Convert inside the list.
- One-off → reusable: the list exactly as it is now becomes the template future runs start from, and the list you're checking off simply carries on as a run.
- Reusable → one-off: your newest in-progress run becomes the list (checks kept); if there isn't one, a fresh one starts from the template.
Past runs are never thrown away — they're tucked out of sight while the list is a one-off and come back if you convert it again. Daily to-do lists don't convert.
Send a copy
Send a checklist to a friend and they get their own copy to check off — yours stays yours.
- Open a checklist and tap ⋯ → Share.
- Send the link through Messages, email, or any app you like.
- When they tap it, Checklist: Reusable Lists opens and imports a copy into their library.
Copy links are end-to-end encrypted — the key travels inside the link, so the list can't be read on the way. Links expire automatically.
Ready-made templates
Don't start from scratch. The website has free, expert checklists — travel packing, camping, moving, hospital bag, groceries and more — that open straight into the app.
- On your iPhone, browse getchecklist.app/checklists and open a list.
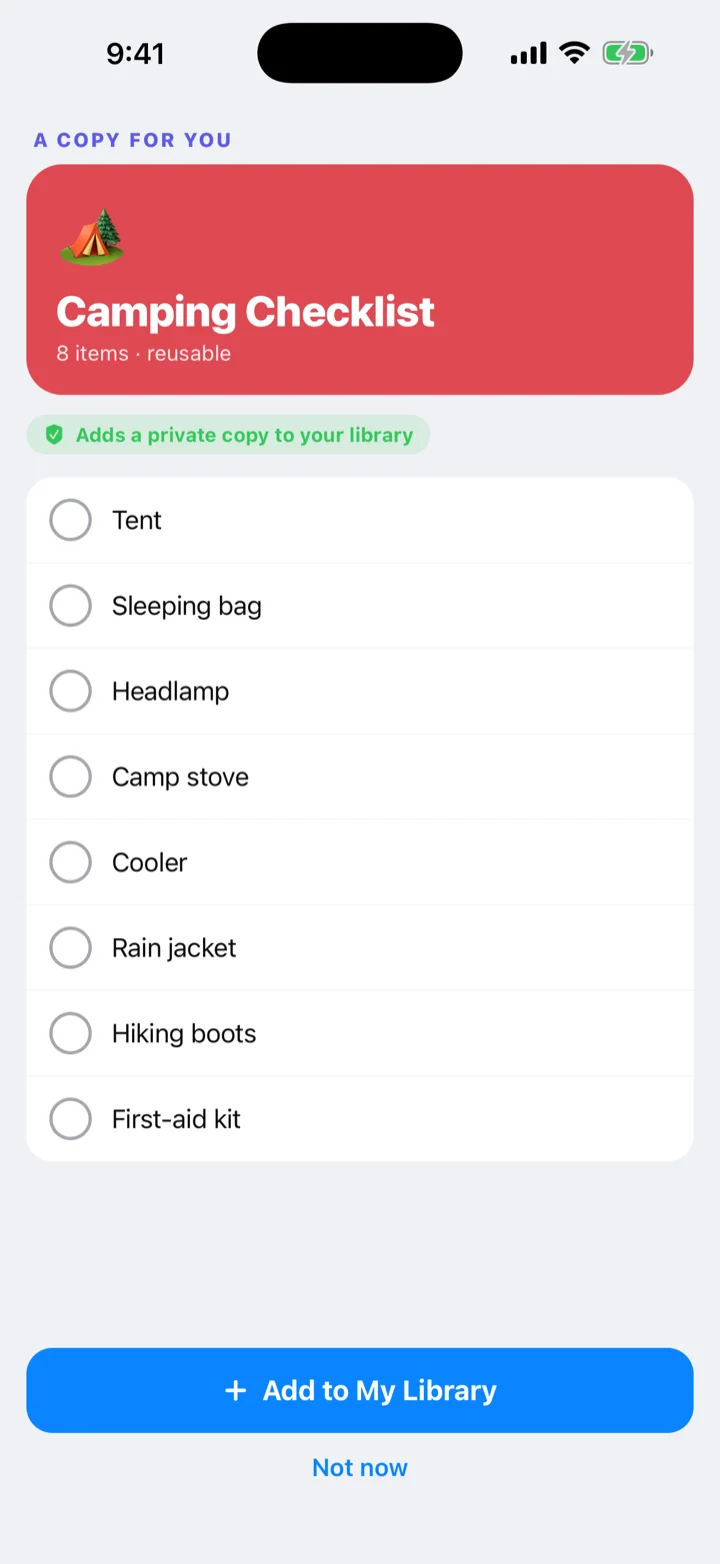
- Tap Open in Checklist. The app opens with A copy for you.
- Tap Add to My Library. It's a private copy — yours to edit, run, and reuse forever.
.checklist files work the same way: open one from AirDrop, Files, Mail, or Messages and the app offers to add it to your library.
Collaborate live PRO
Hosting a live list is a Checklist Pro feature. Joining is free — anyone with the app can accept your invite. Unlock Pro in Settings → Checklist Pro — annual or one-time purchase, with Family Sharing included.
Check off one list together, in real time — a family packing list, a party plan, a shared shopping run. Everyone sees checks land as they happen.
- Open a list you're checking off and tap ⋯ → Collaborate live.
- The iOS invite sheet appears — send the invite through Messages, email, or any app you like. If Messages won't send it, open the people discs and tap Share invite link to send a plain link instead.
- When someone accepts, the list opens on their phone and you're checking it off together. Each person's checks show in their own color.
Who's in the list
Tap the people discs at the top of a shared list to see who's in it (Shared with), send the invite link again, or Stop sharing. Only this run is shared — a reusable template stays private and unchanged.
Changes sync through iCloud, straight between the people in the list — never through our servers, and no Checklist account is needed. Everyone taking part needs to be signed in to iCloud on their iPhone.
iCloud Sync PRO
This is a Checklist Pro feature. Unlock it in Settings → Checklist Pro — annual or one-time purchase, with Family Sharing included.
Keep your library the same on your iPhone, iPad, and Mac — and get it back after a reinstall. Off by default; turn it on when you want it.
- On each device, open Settings → iCloud Sync and turn it on.
- Your checklists, one-off lists, daily to-dos, and history sync through your own iCloud. Be signed in to the same Apple Account on every device.
- Changed your mind? Turn it off any time — your lists stay on the device. Remove My Data from iCloud deletes the synced copy from your iCloud.
There is still no account and no server of ours in between — sync goes straight through your private iCloud.
Daily to-do PRO
This is a Checklist Pro feature. Unlock it in Settings → Checklist Pro — annual or one-time purchase, with Family Sharing included.
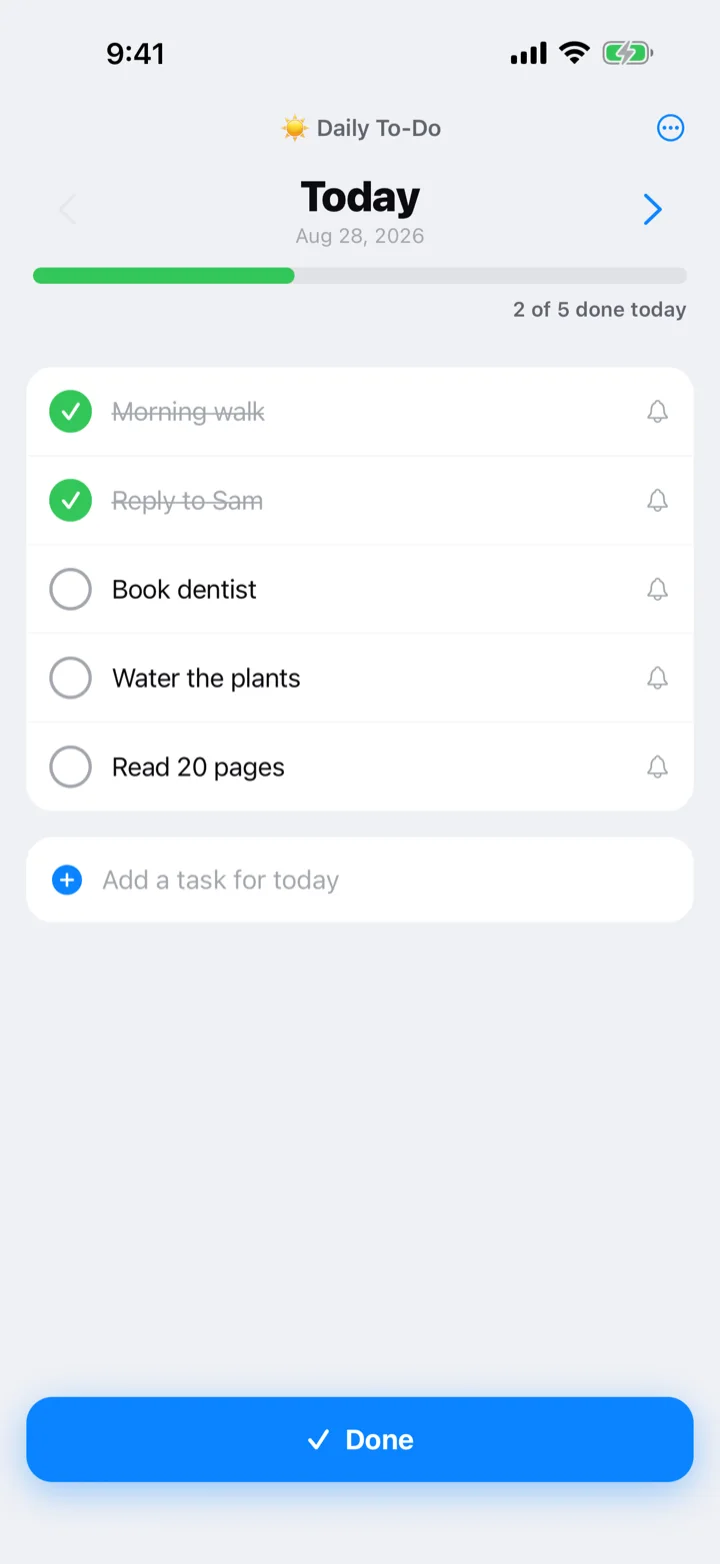
A self-managing to-do list, one day at a time. Whatever you don't finish today is waiting for you tomorrow; whatever you finish stays on the day you did it.
- Tap New and choose Daily to-do. Give it a name and an icon — it opens on Today.
- Add today's tasks. Group them into sections if you like, just like any list.
- Tap › to step into the future and plan tasks for a later day. They appear on that day, then roll forward until you check them off.
- Check things off as you go. Anything still open at the end of the day simply shows up on tomorrow's list — no dragging, no rescheduling.
Looking back
Tap ‹ to jump to the last day you completed something — empty days are skipped. Past days are read-only; unchecking a task there brings it back to Today. Each day with completed tasks also shows up in Activity.
On the Library tab the card shows how many tasks are open for today — e.g. 3 for today. Filter the library by Daily to see just these.
Share a daily list too — Collaborate live PRO invites others to check things off with you, just like a shared checklist. Free to join; hosting is part of Pro.
Quick Add PRO
This is a Checklist Pro feature. Unlock it in Settings → Checklist Pro — annual or one-time purchase, with Family Sharing included.
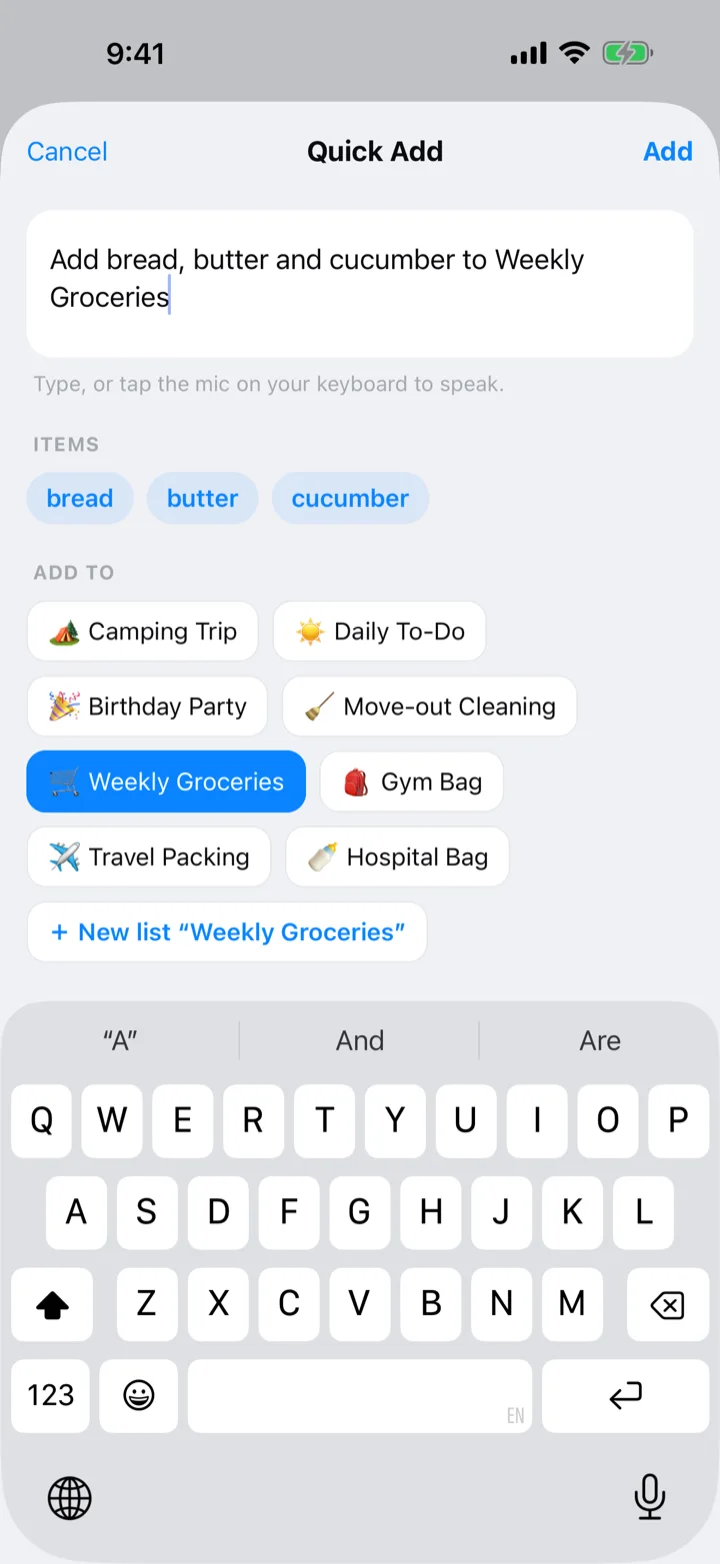
Say or type a whole list in one sentence — "Add bread, butter and cucumber to Groceries" — and every item lands where it belongs.
- On the Library tab, tap the ✨ button next to Search.
- Type your sentence, paste a whole list, or tap the mic on the keyboard to dictate it.
- The items it found appear as chips — check them over, then pick where they go under Add to: an existing list or a new one.
- Tap Add. Done.
Mention a list by name ("… to Groceries") and Quick Add suggests it for you.
On iPhones, iPads, and Macs with Apple Intelligence, your sentence is understood by Apple's on-device model — messy wording, quantities ("two packs of napkins"), and headings included. Everywhere else, Checklist's built-in parser does the job. Either way it is private and offline: nothing leaves your device.
Reminders PRO
This is a Checklist Pro feature. Unlock it in Settings → Checklist Pro — annual or one-time purchase, with Family Sharing included.
Turn any item into a calendar reminder so it pings you at the right moment — buy ice at 4 pm, passport the night before the trip.
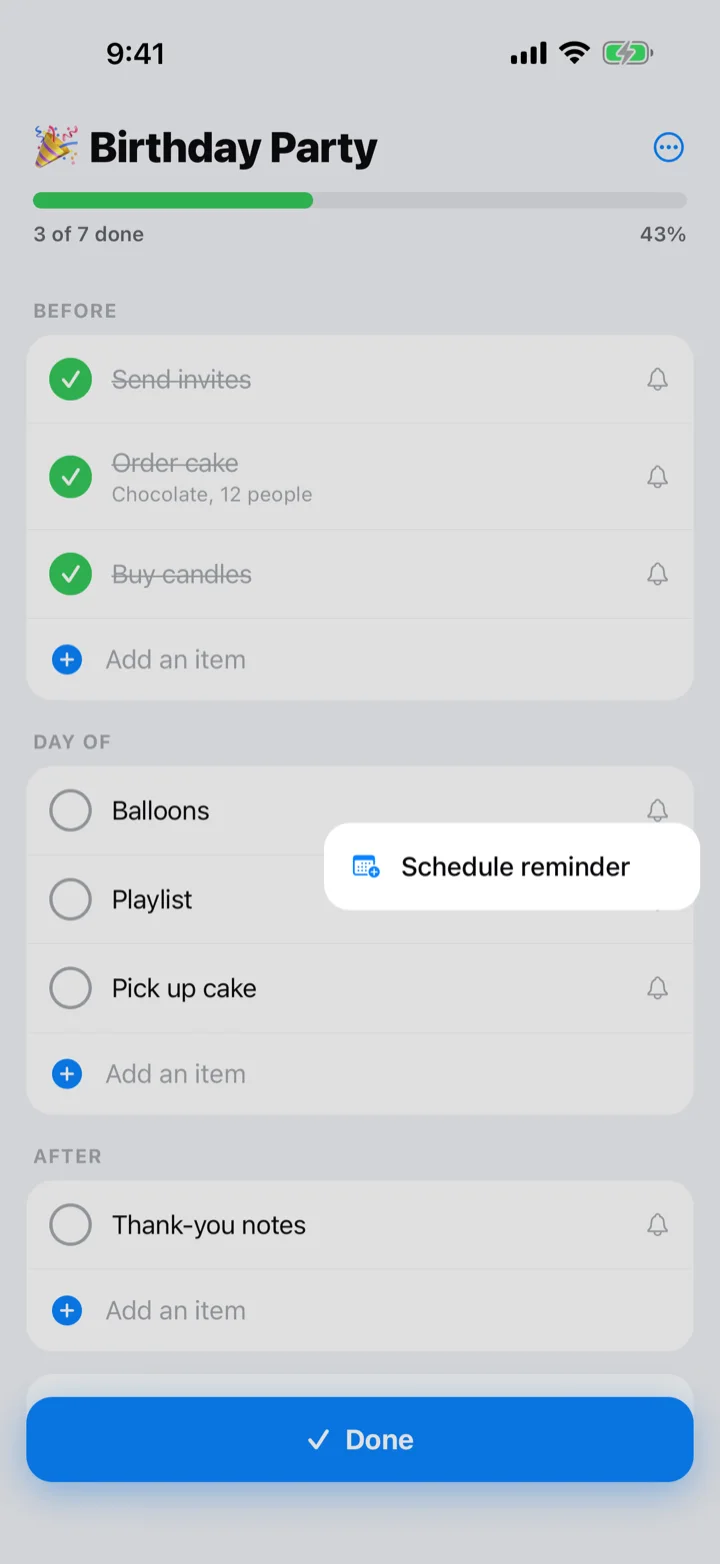
- While checking off a list, tap the 🔔 bell on any item.
- Choose Schedule reminder — the iOS calendar sheet opens with the item already filled in.
- Pick a date and time and tap Add. The bell turns solid.
- Tap the bell again to edit or remove the reminder.
Reminders are saved as events in your own calendar, with an alert at the time you choose. The first time, iOS asks for calendar access. Works in Daily to-do lists too.
Print & export PRO
This is a Checklist Pro feature. Unlock it in Settings → Checklist Pro — annual or one-time purchase, with Family Sharing included.
Get a checklist onto paper or into a file — a packing list on the fridge, a cleaning list for the whole house, a copy for someone without the app.
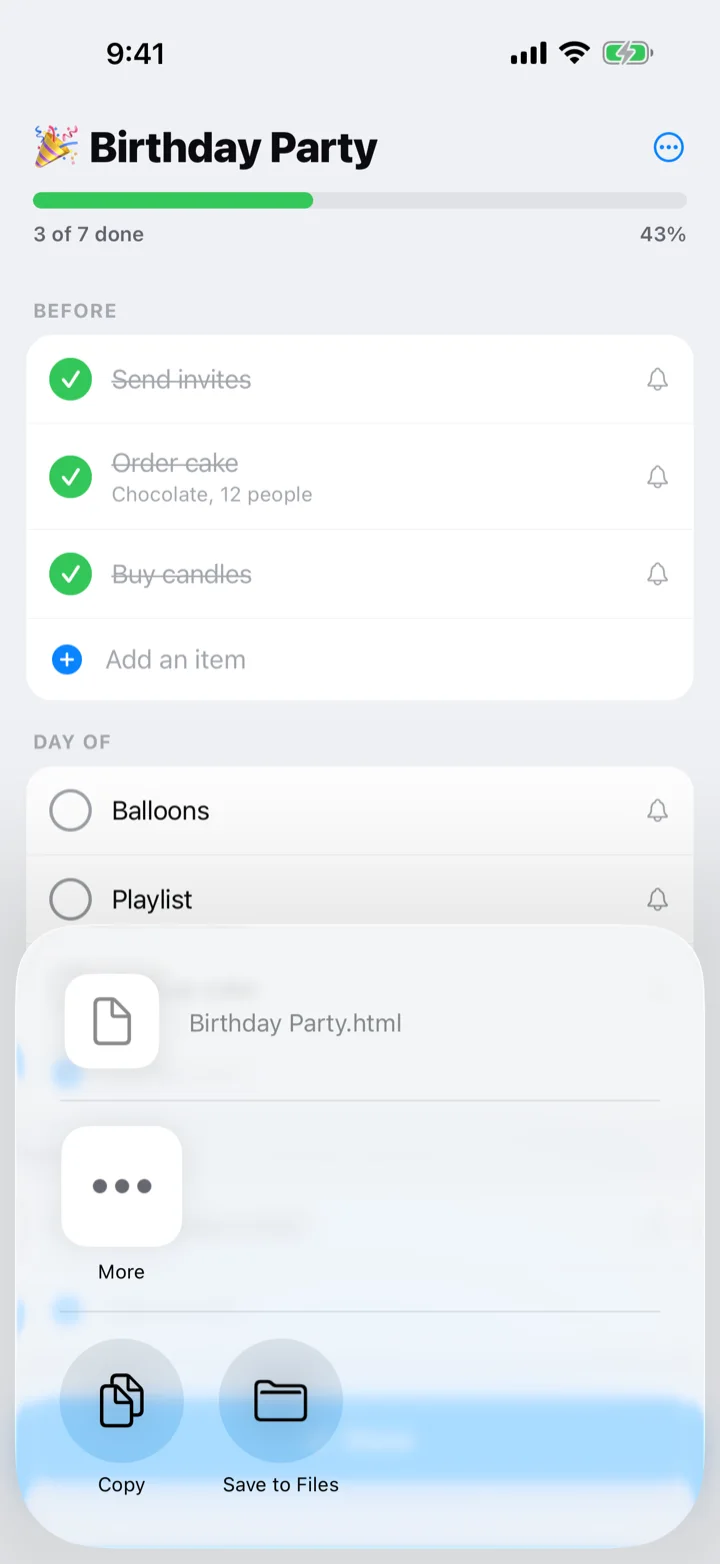
- Open a list and tap ⋯ → Print.
- The iOS share sheet opens with a clean, printable version of the list — sections, items, quantities, and what's already checked.
- Choose Print to send it to a printer, Save to Files, or share it through any app.
Checklist Pro PRO
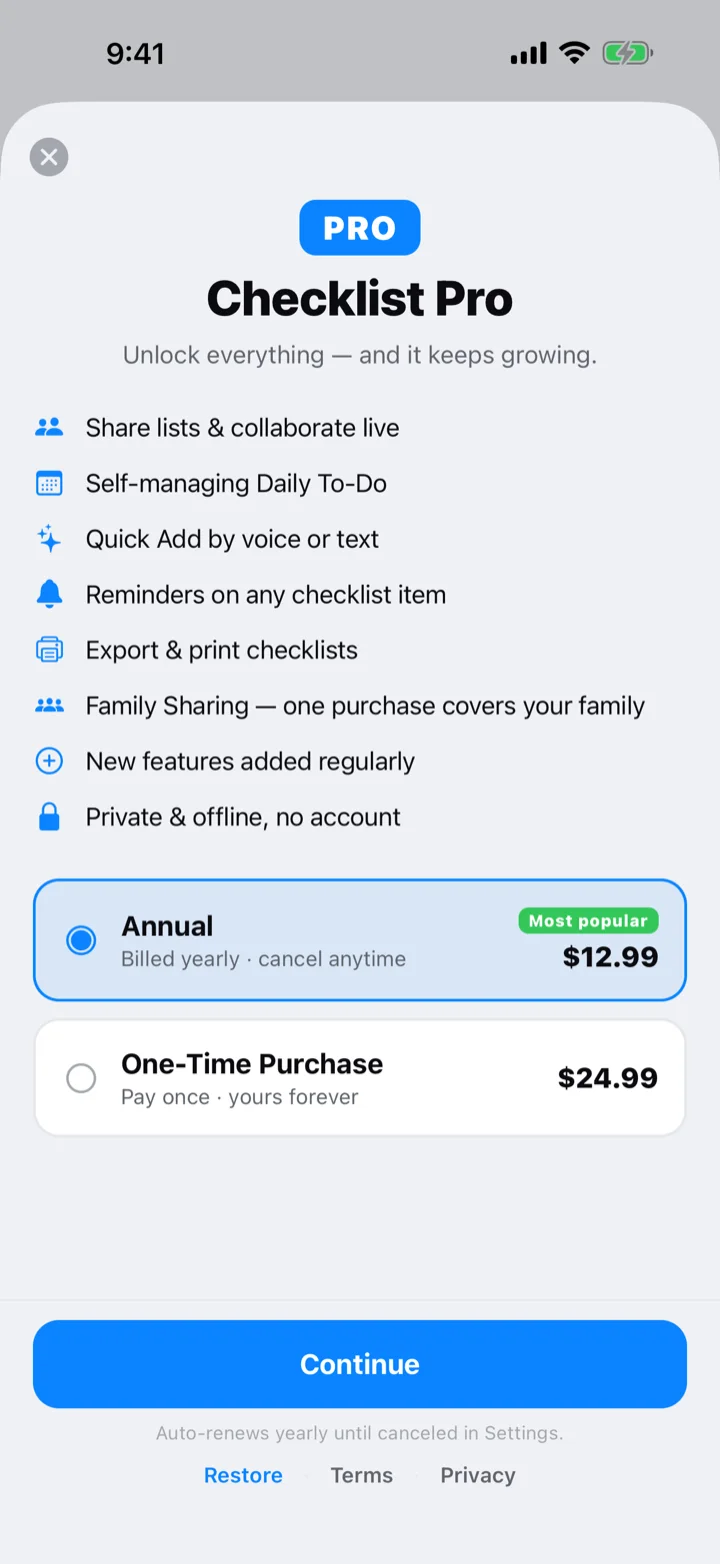
The free app is complete and unlimited — as many lists, items, and runs as you like. Checklist Pro adds the power features, in one purchase.
What's included
- Collaborate live — host a shared list (joining is free for everyone).
- Daily to-do — the self-managing daily list.
- Quick Add — a whole list from one typed or spoken sentence.
- Reminders — a calendar alert on any item.
- Print & export — any list on paper or as a file.
Pricing & how to unlock
$12.99 a year or $24.99 once — your choice, side by side on the same screen. Both include Family Sharing, so one purchase covers up to six people in your family group. Tap any PRO badge in the app, or go to Settings → Checklist Pro → Unlock Checklist Pro.
New iPhone, or reinstalled? Settings → Checklist Pro → Restore Purchases brings Pro back. The annual plan is managed like any subscription, in your iPhone's Settings → Apple Account → Subscriptions.
Action Button
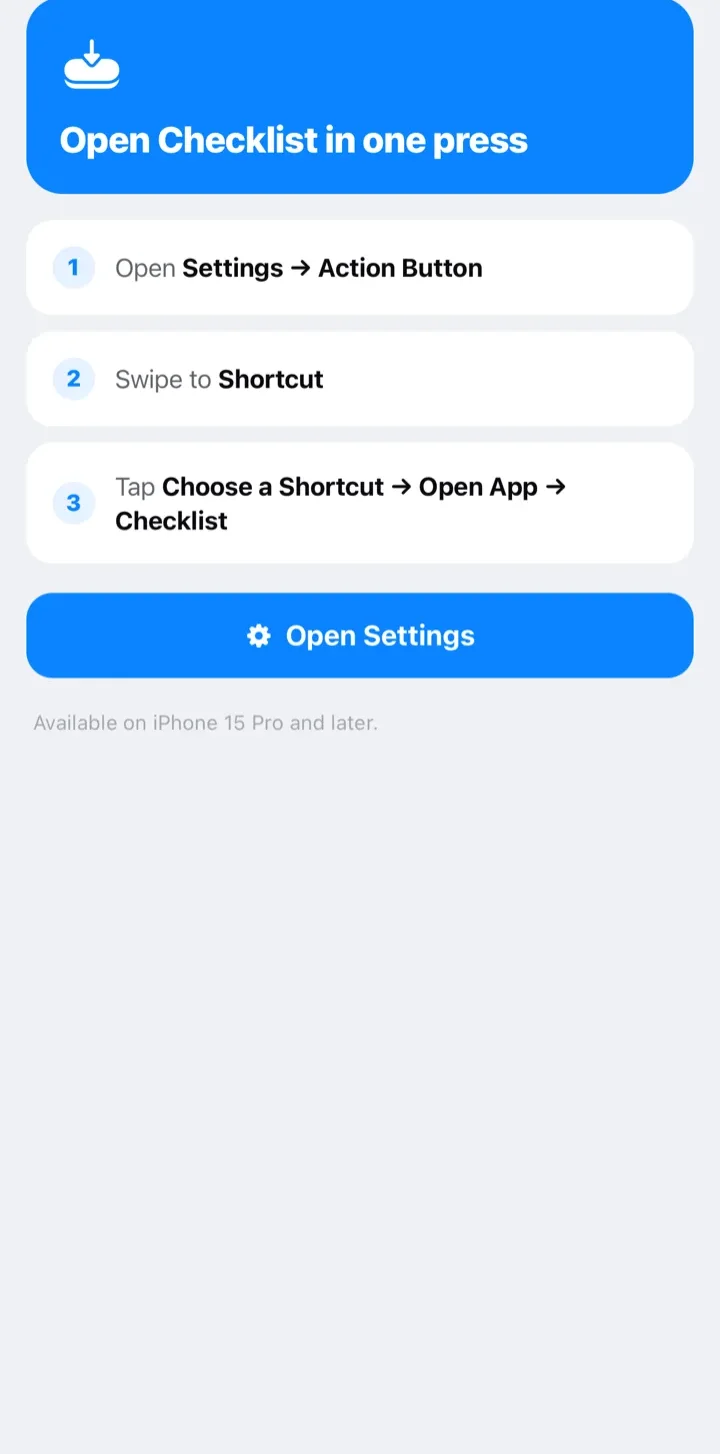
On iPhone 15 Pro and later, put Checklist on the Action Button — one press opens your library, wherever you are.
- In the app, open Settings → Set up Action Button and tap Open Settings.
- In iPhone Settings, open Action Button and swipe to Shortcut.
- Tap Choose a Shortcut → Open App → Checklist. Done — press to open.
The row only appears on iPhones that have an Action Button.
iPad & Mac
The same app runs on iPhone, iPad, and Apple silicon Macs — one download, one purchase, every screen.
Screens adapt to the larger display: the Library shows more checklists per row, lists keep a comfortable reading width, and everything works in landscape, Split View, and Stage Manager. With a trackpad or mouse, checklists and menu items respond to hover.
Want the same lists on every device? Turn on iCloud Sync PRO.
Activity & history
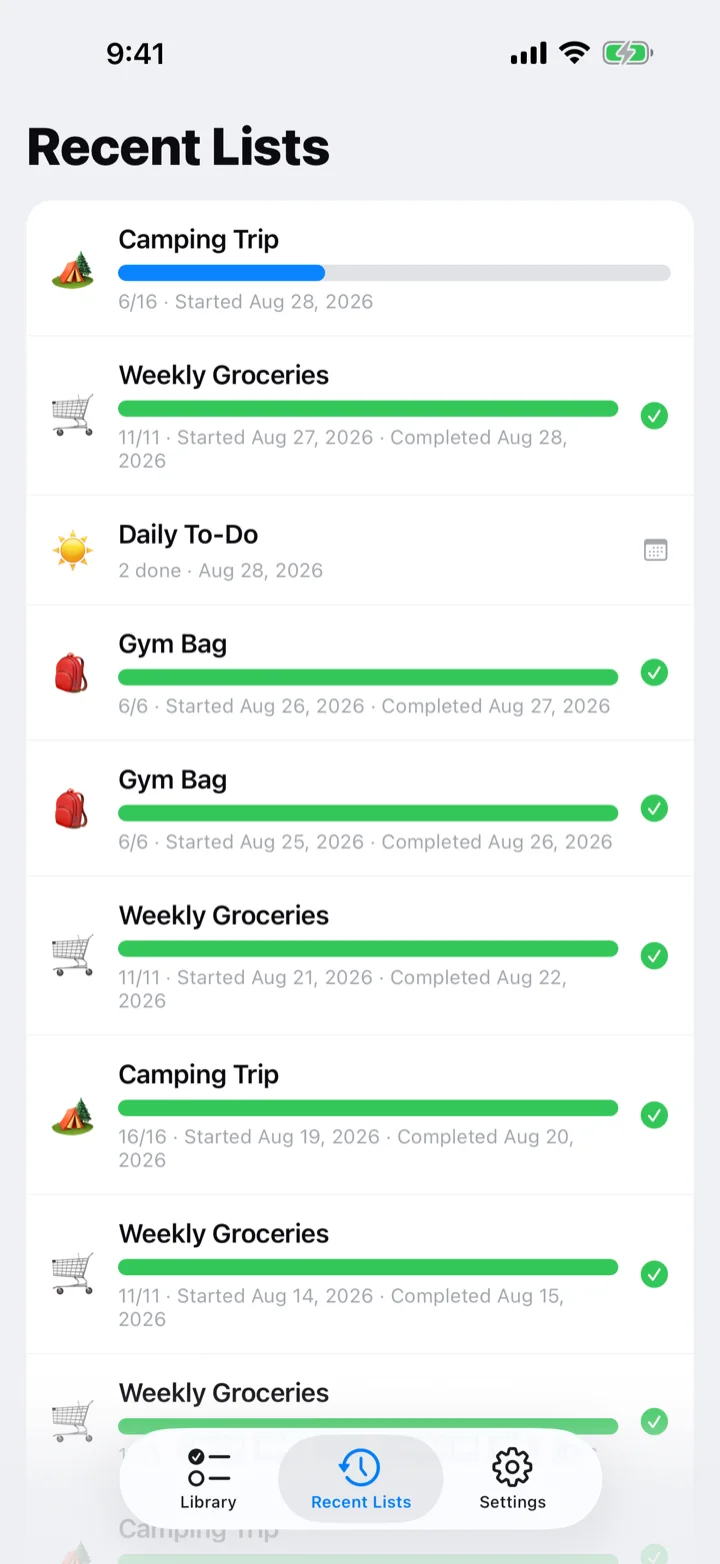
The Activity tab lists your Recent Lists — everything you've been checking off, and every run you've completed.
Each entry shows the list's emoji, its progress bar, the count, and when it was started and finished. Tap one to jump back in and keep going, or to revisit a finished run. Swipe left to remove a past run.
Prefer a cleaner look? Turn List history off in Settings — past runs stay tracked but out of sight.
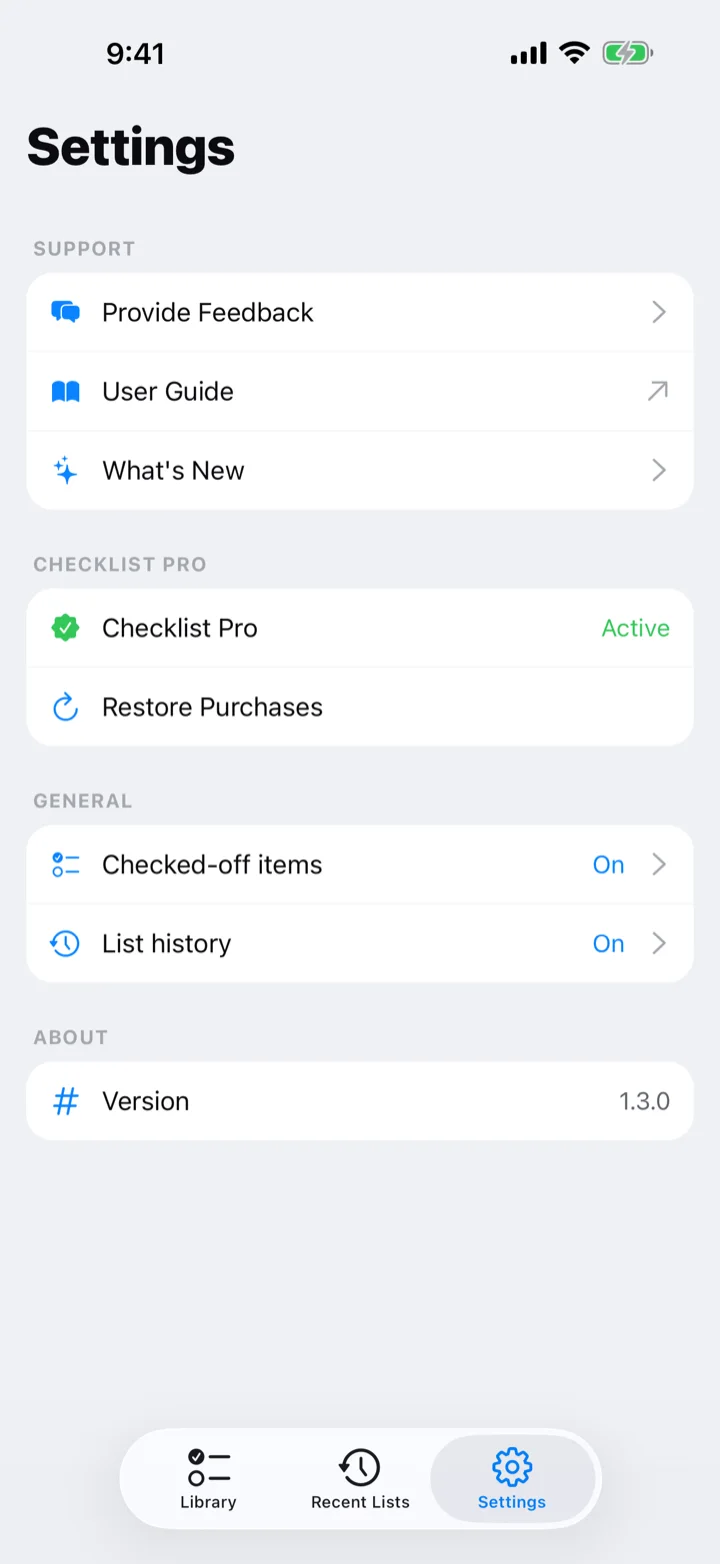
Settings & privacy
Checklist: Reusable Lists is private by design. The Settings tab keeps a few useful switches and confirms exactly how your data is handled.
What you'll find
- User Guide — this page, right inside the app.
- What's New — a running list of recent updates and features.
- Provide Feedback — report a problem or suggest an idea.
- Checklist Pro — Unlock Checklist Pro (annual or one-time, with Family Sharing), or Restore Purchases if you've already bought it, e.g. on a new iPhone.
- Checked-off items — keep completed items in place, or let them drop down under Done.
- List history — show or hide completed runs.
- iCloud Sync PRO — keep your library the same on all your devices (see iCloud Sync).
- Set up Action Button — on iPhones with an Action Button, open Checklist with a press (see Action Button).
Your privacy
Storage is on device, the app works offline always, and no account is ever needed. Your lists are yours. With iCloud Sync on, they also live in your private iCloud — still no account, still nothing on our servers.